System Description and Operating Instructions -
Page 7
To navigate this online manual for Wise/POS quickly, use the
Table of Contents links along the right side of the page to skip to the section you wish
to read.
If you have further questions, please contact us at wise@wiseinc.com.
Configuration
This section of the WESpos manual describes the setting of the
system configuration parameters using the Configure program (CfgFile.exe). The
configuration file is used, by the individual programs of the system, when each program is
started. Any WESpos programs running on the computer being configured should be shut down
before changing the configuration parameters. The new parameters will become effective
when the programs are started.
Step By Step Configuration
A. Decide where each
computer will be located.
1. It is suggested that the main cash
register transaction computer contain the master database and the office computer contain
daily backups of the master database. If the folder named "Database" was set to
shared as recommended in the setup and installation directions you will be able to copy
the main database to any or all of the backup locations. All of the computers in the
system must use only the main database as their working database. If you have only one
computer, and therefor don’t have a network, you will have to backup your database to
a zip disk, or floppy disks.
2. The Catalogs can be installed on
either or both computers. No back up provisions are necessary since these databases can be
reloaded from the disks obtained from product suppliers at any time.

B. Configure the main cash register computer.
1. Move the cursor to ‘START’ at the lower left corner of
the monitor screen and click the left mouse button once.
2. Move the cursor up to ‘WESpos’.
3. Move the cursor over to the right and down to
‘Configure’.
4. Click the left mouse button on Configure.
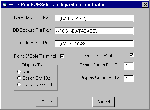
5. Set the various parameters in the window. See Configuration Screen
View 1 below.
a. Data Base File Path:
Set the path for the computer that will hold the master database. The main database can be
setup on any computer (recommend the most active cash register computer). The default
path, ‘C:\DATABASE\’ (The backslash at the end is required.), on a newly
installed computer is recommended. Note that only one computer in your system can have its
database file path set like this. All others including any secondary point of sale
terminals must have their database paths set like the office computer in para. C.5.a.
below.
b. DB Backup File Path:
When the point of sale program, which is running on the computer having the main database,
is exited at the end of the day, the backup program runs automatically. The file path in
this box is where the system will place the backup copy of the working databases. In the
example shown the office computer having the name POS1 was used for backup. A better
solution is to install a zip drive in the main POS computer and backup to the zip drive at
least once a day. In that case the path in this box would be to the zip drive.
c. Catalogs File Path:
Catalog directories can be on any or all computers. To set up the Catalogs on the cash
register transaction computer we recommend the default path ‘C:\CATALOG\’ (The
backslash at the end is required.).
d. Point of Sale Terminal:
Move the cursor to the box labeled ‘Point of Sale Terminal’ and click the left
mouse button. A checkmark will appear in the box, informing the WESpos programs that will
run on this computer that it is a point of sale terminal.
e. Sales Slip Printer:
Move the cursor to the box labeled ‘Sales Slip Printer’ and click the left mouse
button. A checkmark will appear in the box, so the POS program knows that a slip printer
is attached.
f. Printer Communications Port:
Move the cursor to the box labeled ‘Printer Comm Port #’. Type in the comm port
number that the printer is connected to even though it may go through a customer display
to get there. Normally the comm port number is a ‘2’.
g. Set the Customer Display Type:
To select the Epson DM-102, move the cursor to the selector button beside the name Epson
DM-102 and click the left mouse button. A black dot should appear in this button graphic
and the black dot should disappear from any button that previously had the black dot.
Select the "Tysso" display if you have it, or "None" if your system
has no customer display, in the same fashion.
h. Customer Display Communications Port:
Move the cursor to the box labeled ‘Display Comm Port #. Type in the comm port number
that the Customer Display is connected even though a printer may also be connected to the
Display. Normally the comm port number is a ‘2’. NOTE: If a printer and Customer
Display are both connected to the same comm port then the same comm port number will have
to be entered in the Printer Comm Port # and the Display Comm Port #.
6. Move the cursor to the button labeled ‘Done’ and click
the left mouse button.

C. Configure the office computer.
1. Move the cursor to ‘START’ at the lower left corner of
the monitor screen and click the left mouse button once.
2. Move the cursor up to ‘WESpos’.
3. Move the cursor over to the right and down to
‘Configure’.
4. Click the left mouse button on Configure.
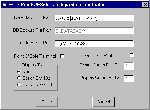
5. Set the various parameters in the window. See Configuration Screen
View 2 below.
a. Data Base File Path:
Set the path for the computer that will hold the master database. The database can be
setup on any computer (we recommend the most active cash register computer). Change the
default path to: \\\DATABASE\’ (The backslash at the end is required.). For example,
if the computer that you designated to be you main database location was given the name
"POS2", the path would be: \\POS2\DATABASE\
b. DB Backup File Path:
When the point of sale program, which is running on the computer having the main database,
is exited at the end of the day, the backup program runs automatically. The file path in
this box is where the system will place the backup copy of the working databases. In the
example shown the office computer having the name POS1 was used for backup. A better
solution is to install a zip drive in the main POS computer and backup to the zip drive at
least once a day. In that case the path in this box would be to the zip drive.
c. Catalogs File Path:
Catalog directories can be on any or all computers. To set up the Catalogs on the office
computer, keep the default path ‘C:\CATALOG\’ (The backslash at the end is
required.).
d. Point of Sale Terminal:
Make sure the box labeled ‘Point of Sale Terminal’ does NOT contain a checkmark.
If the box does have a checkmark in it move the cursor to the box and click the left mouse
button once. The checkmark should disappear and leave the box empty. e. Sales Slip
Printer: Make sure the box labeled ‘Sales Slip Printer’ does NOT contain a
checkmark. If the box does have a checkmark in it move the cursor to the box and click the
left mouse button once. The checkmark should disappear and leave the box empty.
f. Printer Communications Port:
The box labeled ‘Printer Comm Port #’ will not normally apply to the office
computer because this relates only to a sales slip printer, if there is a number in it the
number will be "grayed" because the sales slip printer is turned off.
g. Set the Customer Display Type:
The ‘Display Type’ will not normally apply to a computer that is not a point of
sale terminal. The selector button beside the ‘none’ should be selected. If the
‘none’ button is not selected, move the cursor to the ‘none’ button
and click the left mouse button once. A black dot should appear in the button.
h. Customer Display Communications Port: The ‘Display Comm Port #
will not apply to a computer which has no customer display and if there is a number in it
the number will be grayed out.
6. Move the cursor to the button labeled ‘Done’ and click
the left mouse button once.


Configuration Screen
View 1 is a typical setup for the main point of sale terminal. This would also be the
configuration if your system is a single computer system. For a point of sale terminal
which is not the main database location, the "Data Base File Path would be set to
point to the main database as indicated for an office computer shown in Configuration
Screen View 2 below. All other parameters would remain the same as view 1. If a Tysso
display is connected you will have to select that option, and set the Display Comm Port#
to 1.

This is a typical configuration to use for any computer that is not a
point of sale terminal. A typical networked system may have one computer configured like
this for the office. A large system may have an additional computer configured like this
where one is used for the receiving area. The database path name assumes that the computer
which has been designated as the main database location was given the name
"POS2".

|


